Capturing: Difference between revisions
No edit summary |
|||
| Line 1: | Line 1: | ||
With the Allegro Network Multimeter it is possible to create a capture in | With the Allegro Network Multimeter it is possible to create a capture in | ||
pcap format which can be opened in tools such as Wireshark. | |||
== How can I get a | == How can I get a pcap of a specific IP or MAC address? == | ||
The | The Allegro Network Multimeter modules provide a dedicated pcap button | ||
to capture almost all types of traffic. To capture a specific IP address go to 'IP' -> 'IP' statistics, navigate to | |||
traffic. | the desired IP address and click the pcap button. | ||
the desired IP address and | |||
{| | {| | ||
| Line 12: | Line 11: | ||
|} | |} | ||
To find an IP | To quickly find an IP address, you can sort the IP table by almost every column. The filter | ||
offers a quick | offers a quick method to reduce the table content, e.g. by typing fragments of the | ||
IP address or the DNS name in the filter input field. | IP address or the DNS name in the filter input field. | ||
Another quick way to | Another quick way to create a pcap of a specific address is to use the simple capture. Go | ||
to 'Generic' -> 'Capture traffic', enable the MAC | to 'Generic' -> 'Capture traffic', enable the MAC Switch, set an address and click the | ||
"Start capture" button. | "Start capture" button. | ||
| Line 24: | Line 23: | ||
|} | |} | ||
== | == Which settings shall I choose? == | ||
After | After clicking on the capture button, the dialogue "Choose capture settings" will be | ||
displayed. Here you can limit the start and end time of the capture and select | displayed. Here you can limit the start and end time of the capture and select | ||
whether the created | whether the created pcap file is downloaded via your browser directly to your | ||
computer or stored on the attached storage device of the Multimeter. You can | computer or stored on the attached storage device of the Multimeter. You can | ||
limit the captured packets to the given length if you do not need the full packet | limit the captured packets to the given length if you do not need the full packet | ||
and want a small | and want a small pcap file that opens faster in Wireshark. | ||
{| | {| | ||
| Line 37: | Line 36: | ||
|} | |} | ||
Clicking the "Start capture" begins the capture. | |||
== How can I extract traffic from the past? == | == How can I extract traffic from the past? == | ||
By | By utilizing the Allegro Network Multimeter packet ring buffer, it is | ||
possible to extract traffic from the past | possible to extract traffic from the past to create a pcap. The packet ring | ||
buffer is stored on the external storage device that is attached to the USB | buffer is stored on the external storage device that is attached to the USB | ||
port or an internal storage device if your Allegro Network Multimeter is | port or an internal storage device if your Allegro Network Multimeter is | ||
equipped with one. | equipped with one. A fast USB3 capable SSD is recommended. A | ||
USB thumb drive can be used, too, but some packets | USB thumb drive can be used, too, but some burst packets may be dropped if the | ||
thumb drive is too slow. | thumb drive is too slow. | ||
You can see an overview about all storage devices | You can see an overview about all storage devices that can be used for the Allegro Multimeter | ||
under 'Generic' -> 'Storage'. | under 'Generic' -> 'Storage'. | ||
| Line 56: | Line 55: | ||
|} | |} | ||
An external SSD is attached to the USB port and is not activated | An external SSD is attached to the USB port and is not yet activated. Click the | ||
"Activate" button so the device can be used. If the filesystem of the disk is not | "Activate" button so the device can be used. If the filesystem of the disk is not | ||
suitable for the ring buffer a warning will pop up | suitable for the ring buffer a warning will pop up prompting you to format the disk. | ||
After formatting or activating, the storage page will display information | |||
on disk useage and an overview of all files on the disk. | |||
{| | {| | ||
| Line 67: | Line 66: | ||
Now that the storage is active, the ring buffer has to be created if not already | Now that the storage is active, the ring buffer has to be created if not already | ||
prepared during formatting. This can be achieved in 'Generic' -> 'Packet ring buffer'. | |||
Click the "Create ring buffer" button. | |||
{| | {| | ||
| Line 74: | Line 73: | ||
|} | |} | ||
The size of the ring buffer has to be specified. If no | The size of the ring buffer has to be specified. If no pcap is required on | ||
the storage device, the ring buffer may use 100% of the | the storage device, the ring buffer may use 100% of the storage device capacity. | ||
{| | {| | ||
| Line 82: | Line 81: | ||
When the packet ring buffer is created and running, the "Packet ring buffer" | When the packet ring buffer is created and running, the "Packet ring buffer" | ||
statistics page shows information about | statistics page shows information about the ring buffer useage and several | ||
graphs | graphs restored or filtered traffic are displayed. A filter can be applied | ||
to control which packets are stored in the ring buffer. Check out the chapter | to control which packets are stored in the ring buffer. Check out the chapter | ||
[[Generic_modules(Teil_3)#Packet_ring_buffer|Packet ring buffer]] for more details. | [[Generic_modules(Teil_3)#Packet_ring_buffer|Packet ring buffer]] for more details. | ||
| Line 92: | Line 91: | ||
|} | |} | ||
When the packet ring buffer is up and running, any capture may be utilized to | |||
extract traffic from the past. | extract traffic from the past. Select a timespan in any graph of the user interface | ||
by left clicking with the mouse and then | by left-clicking with the mouse and then click a pcap button. | ||
The selected timespan will be displayed in the start and end time fields of the | The selected timespan will be displayed in the start and end time fields of the | ||
"Choose capture settings" | "Choose capture settings" dialogue. | ||
{| | {| | ||
| Line 103: | Line 102: | ||
|} | |} | ||
Start and end | Start and end times can be changed by using the date and time popup window when | ||
selecting the time fields or | selecting the time fields or clicking the dedicated buttons for commonly used times. | ||
If the start time is earlier than the start of the packet ring buffer, it will | If the start time is earlier than the start of the packet ring buffer, it will | ||
be adjusted to the start and a hint will be displayed. | be adjusted to the start and a hint will be displayed. | ||
| Line 110: | Line 109: | ||
== Is it possible to plan a capture in the future? == | == Is it possible to plan a capture in the future? == | ||
Yes. Simply select the desired start time in the "Choose capture settings" | Yes. Simply select the desired start time in the "Choose capture settings" dialogue | ||
and the capture will start with the first packet at that time. | and the capture will start with the first packet at that time. | ||
| Line 116: | Line 115: | ||
Captures can be stared with complex filter expressions for a specific capture of e.g. | Captures can be stared with complex filter expressions for a specific capture of e.g. | ||
an IP address or a | an IP address or a Layer 7 protocol. | ||
To | To see a basic overview, start a capture from any module and the expression of | ||
that capture is shown by clicking on the "Active captures" button | that capture is shown by clicking on the "Active captures" button at the top of every | ||
page. | page. | ||
| Line 127: | Line 126: | ||
|} | |} | ||
On the "Capture traffic" page, | On the "Capture traffic" page,using the simple capture method, all frequently | ||
used filter expressions are easily accessible. The resulting expression is | used filter expressions are easily accessible. The resulting expression is | ||
displayed below. | displayed below. | ||
Revision as of 10:21, 28 April 2020
With the Allegro Network Multimeter it is possible to create a capture in pcap format which can be opened in tools such as Wireshark.
How can I get a pcap of a specific IP or MAC address?
The Allegro Network Multimeter modules provide a dedicated pcap button to capture almost all types of traffic. To capture a specific IP address go to 'IP' -> 'IP' statistics, navigate to the desired IP address and click the pcap button.
To quickly find an IP address, you can sort the IP table by almost every column. The filter offers a quick method to reduce the table content, e.g. by typing fragments of the IP address or the DNS name in the filter input field.
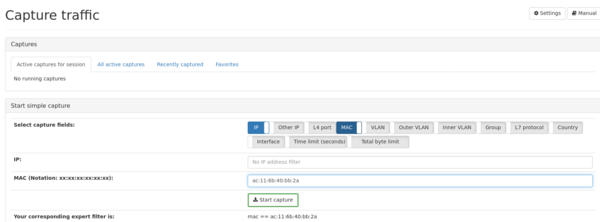
Another quick way to create a pcap of a specific address is to use the simple capture. Go to 'Generic' -> 'Capture traffic', enable the MAC Switch, set an address and click the "Start capture" button.
Which settings shall I choose?
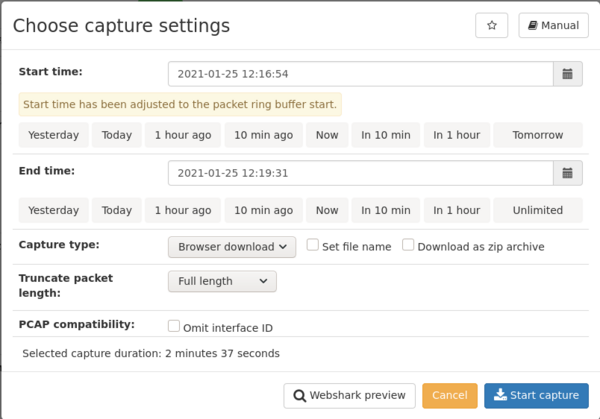
After clicking on the capture button, the dialogue "Choose capture settings" will be displayed. Here you can limit the start and end time of the capture and select whether the created pcap file is downloaded via your browser directly to your computer or stored on the attached storage device of the Multimeter. You can limit the captured packets to the given length if you do not need the full packet and want a small pcap file that opens faster in Wireshark.
Clicking the "Start capture" begins the capture.
How can I extract traffic from the past?
By utilizing the Allegro Network Multimeter packet ring buffer, it is possible to extract traffic from the past to create a pcap. The packet ring buffer is stored on the external storage device that is attached to the USB port or an internal storage device if your Allegro Network Multimeter is equipped with one. A fast USB3 capable SSD is recommended. A USB thumb drive can be used, too, but some burst packets may be dropped if the thumb drive is too slow.
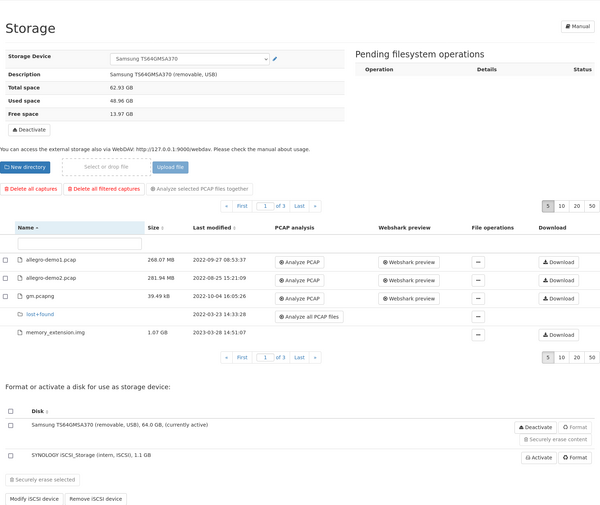
You can see an overview about all storage devices that can be used for the Allegro Multimeter under 'Generic' -> 'Storage'.
An external SSD is attached to the USB port and is not yet activated. Click the "Activate" button so the device can be used. If the filesystem of the disk is not suitable for the ring buffer a warning will pop up prompting you to format the disk. After formatting or activating, the storage page will display information on disk useage and an overview of all files on the disk.
Now that the storage is active, the ring buffer has to be created if not already prepared during formatting. This can be achieved in 'Generic' -> 'Packet ring buffer'. Click the "Create ring buffer" button.
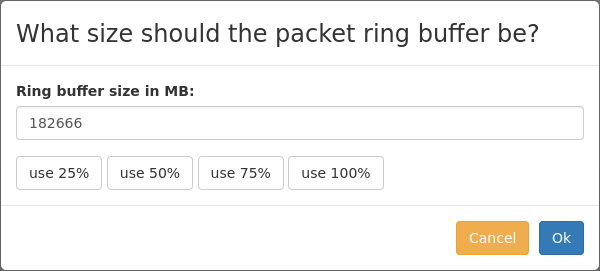
The size of the ring buffer has to be specified. If no pcap is required on the storage device, the ring buffer may use 100% of the storage device capacity.
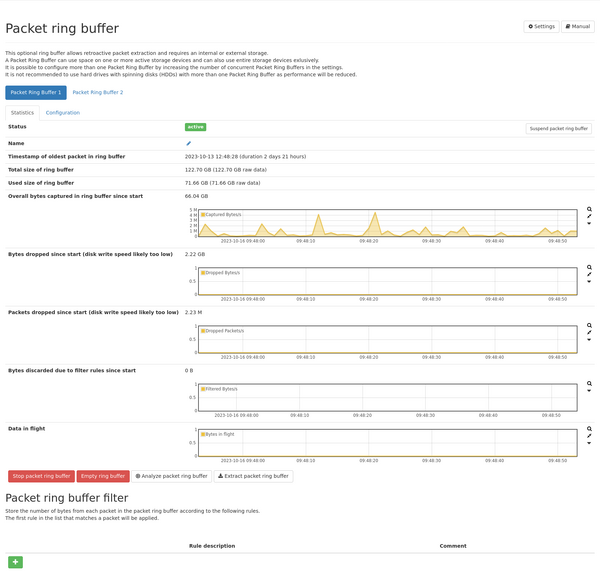
When the packet ring buffer is created and running, the "Packet ring buffer" statistics page shows information about the ring buffer useage and several graphs restored or filtered traffic are displayed. A filter can be applied to control which packets are stored in the ring buffer. Check out the chapter Packet ring buffer for more details.
When the packet ring buffer is up and running, any capture may be utilized to extract traffic from the past. Select a timespan in any graph of the user interface by left-clicking with the mouse and then click a pcap button. The selected timespan will be displayed in the start and end time fields of the "Choose capture settings" dialogue.
Start and end times can be changed by using the date and time popup window when selecting the time fields or clicking the dedicated buttons for commonly used times. If the start time is earlier than the start of the packet ring buffer, it will be adjusted to the start and a hint will be displayed.
Is it possible to plan a capture in the future?
Yes. Simply select the desired start time in the "Choose capture settings" dialogue and the capture will start with the first packet at that time.
Create complex captures with several criteria
Captures can be stared with complex filter expressions for a specific capture of e.g. an IP address or a Layer 7 protocol.
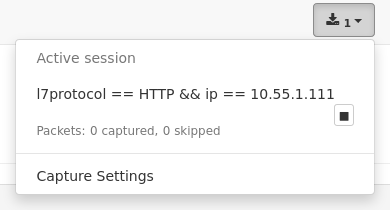
To see a basic overview, start a capture from any module and the expression of that capture is shown by clicking on the "Active captures" button at the top of every page.
On the "Capture traffic" page,using the simple capture method, all frequently used filter expressions are easily accessible. The resulting expression is displayed below.
This expression can be used and edited in the expert capture filter field. All filters can be combined with "and" / "&&" or "or" / "||". Parentheses may be used to clarify precedence.
The chapter Capture module explains every possible filter.
Get a PCAP via command line
It is quite easy to get a PCAP on the command line or in scripts with "curl" which is a tool available for recent versions of Windows 10, Linux and MacOS.
Basically it is just typing:
| curl -k -u USER:PASSWORD https://allegro-mm-XXXX/API/data/modules/capture?expression=ip==10.1.2.3 > path_to/capture.pcap |
The user name, password and hostname have to be the same that are used to access the web interface. Every filter expression that can be used in the web interface can also be used here.
Check out the chapter Capture module for further information.
It takes too long to open a PCAP file in Wireshark. What can I do?
If you are in a situation where you have a huge PCAP and are just interested in the traffic between two particular IP addresses, you can use the Allegro Network Multimeter to analyze the pcap file and extract the specific traffic for post-processing with other tools like Wireshark. See Forensic Pcap Analysis for details.

