Administration
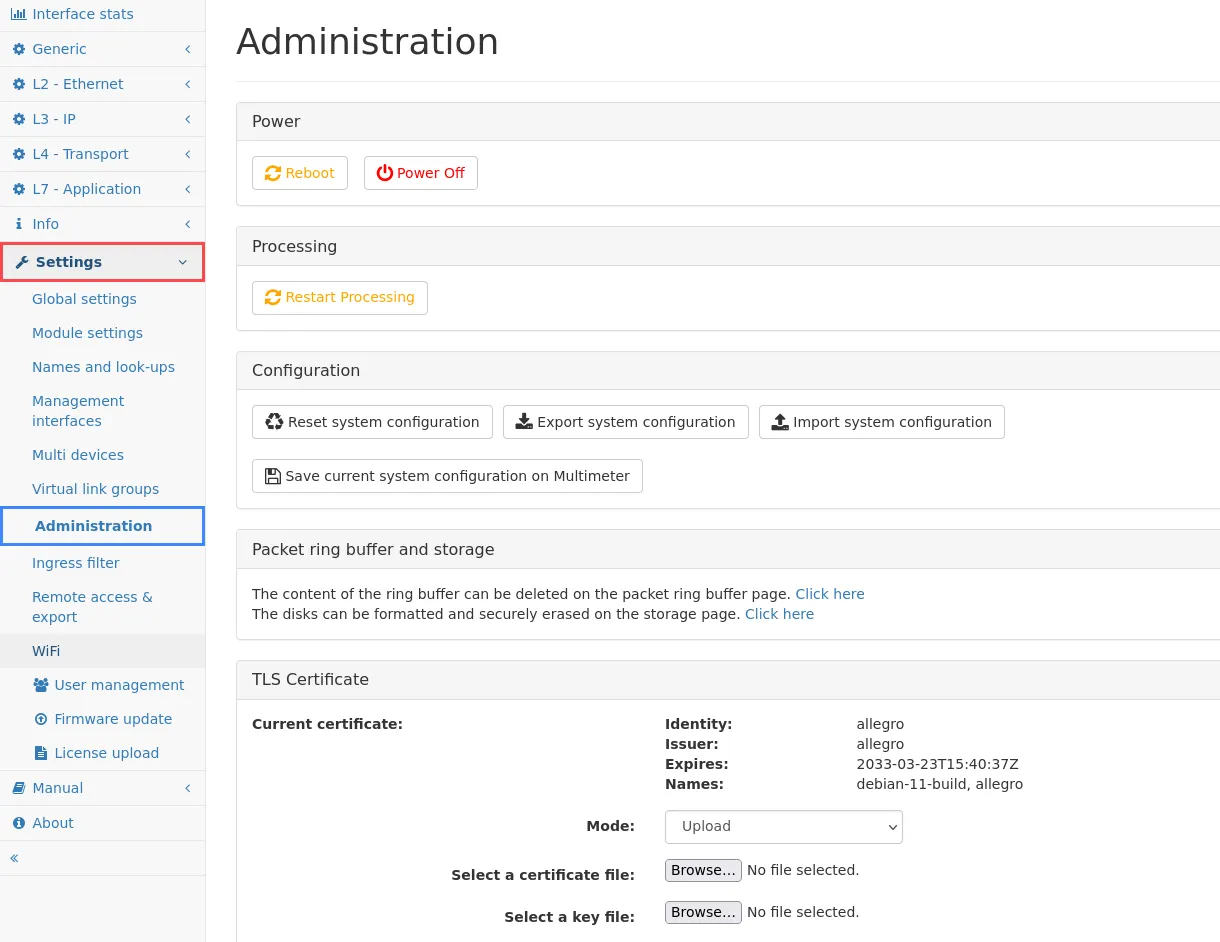
Reboot or power off the Allegro Network Multimeter.
After clicking on the buttons, a confirmation dialogue will appear. Most of the time, rebooting is not necessary since it takes a significant time. If packet processing needs to be restarted because some options cannot be changed during runtime, the next option is a better choice since it minimizes downtime.
Processing
Section titled “Processing”Restart the Allegro Network Multimeter processing software. This will reset all measured statistics.
Choosing this option will stop packet processing but the machine and its web interface is still available as the device itself is not rebooted. The packet processing core is restarted with the current settings and will begin processing packets after a few seconds.
Configuration
Section titled “Configuration”By clicking on the Reset System Configuration button a dialog is displayed that allows to reset all settings, including the network configuration, to factory defaults and the system will be restarted. The dialog allows to select, which of the following settings should be kept untouched, while setting the rest of the system configuration to defaults:
- Management interface settings
- Users and passwords
- Disk and packet ring buffer cluster settings, including optional random device-specific encryption keys
- Allegro Remote Service settings
The Export System Configuration button allows you to export the entire configuration of the Allegro Network Multimeter. A Zip archive can be downloaded and used for import.
The Import System Configuration button allows you to select several configuration items:
- Core settings: All settings of global settings, module settings, incident settings, user defined names, virtual link groups, ingress (NIC) filter and IP groups, excluding management interface settings, multi-device settings, and user settings. Some core settings (network interfaces, virtual link groups, incidents and time synchronization) can also be retained during import. Simply uncheck the global Core settings checkbox und check the child checkboxes for settings to be imported and overwritten.
- Management interface settings: All settings of the management interface (e.g. WiFi, LAN, hostname).
- TLS Certificate Settings: All settings of the configured TLS certificates.
- Multi device settings: All settings on the configured remote devices.
- Users and roles: All users and their passwords. The admin user cannot be changed and cannot be deleted by a configuration import.
- User settings: All user settings (such as search history or dashboard configuration).
It is possible to import the selected settings to all configured remote devices by selecting the last check box.
The Save current system configuration on Multimeter button will store the current configuration as a file on the device itself (in contrast to the export feature, which will download the file the user’s computer).
When there are saved configurations available, any of them can be selected and loaded onto the system again. It is also possible to delete the configuration.
CORS Configuration
Section titled “CORS Configuration”With version 4.1 the option to configure the Cross-Origin Resource Sharing (CORS) settings was introduced.
You can learn about CORS on the MDN Web docs.
Access Control
Section titled “Access Control”Since version 4.1 there is the option to limit the access to the multimeter API, the web interface and some other services like the SFTP server to specific subnets.
If you enable the access control, you have the option to specify the subnets from which people are allowed to access the multimeter.
If you want to allow the access for the clients in the subnet in which the multimeter is deployed you are able to allow that with ticking Allow local access.
TLS certificates
Section titled “TLS certificates”The appliance comes with a pre-installed generic TLS certificate but a custom certificate can be uploaded, generated or downloaded from a Certificate Authority via ACME.
The following modes are supported:
- Legacy: The default certificates the appliance got shipped with will be used if the appliance got shipped with an older firmware than 3.6. You won’t be able to switch back to this option and it will be hidden if it is not selected.
- ACME: The Certificates will be downloaded from the specified Certificate Authority. We support HTTP-01 and TLS-ALPN-01 as challenge types.
- Upload: You are able to upload a X.509 certificate file and a (unencrypted) key file in the .pem-file format. Upon successful upload, this certificate will be used to serve the user interface. The .pem-file should contain the full certificate chain to trust the certificate: If there is an intermediate CA, its certificate should also be in the file. If you already downloaded the certificate signing request and got the certificate from your local certificate authority, you only have to upload the certificate here.
- Self-Signed: Generate self-signed certificates with a custom host-name. They will be valid for 10 years and replace the legacy certificates for devices shipped with firmware version 3.6 or later.
The Default Mode is always the fall-back if the process does not work.
There’s also the option to download a certificate signing request, which you can use to request a certificate from your local administrator. This certificate should be then uploaded via the upload mode.
The Reset to default button will remove any user-provided TLS certificate and the user interface will be served using the default TLS certificate.
With the version 4.2 the option to enable HTTP Strict Transport Security (HSTS) for the multimeter was added. HSTS stops users from trying to access the multimeter via unencrypted HTTP or ignoring invalid certificates for the multimeter.
If the administrator locked themselves out by enabling HSTS there are multiple options:
- If HSTS was already activated and the certificates were changed on purpose after that, they have to remove information about the site from their browser.
- If HSTS was already activated and the certificates were changed by accident, they are able to connect to the multimeter via a private window or via the IP address.
Certificate Authority
Section titled “Certificate Authority”Some features also connect to external TLS services, for instance when sending e-mail notifications via SMTP or when searching for firmware updates. Usually these TLS connections are verified with the built-in CA certificate pool. It is also possible to upload one or many own CA certificates which are used additionally to the system ones.
The button Add New opens a dialog where the file can be selected and uploaded. This file must contain certificates in the PEM format. It may contain multiple certificates.
Before version 3.6 uploading new certificates will replace the existing ones. The button Remove SSL CA certificates will delete the previously installed custom CA certificates so that only the system CA pool is used again for certificate verification.
With version 3.6 uploading a new certificate adds it to the old one. You can delete all by pressing the Remove all CA certificates button, or just remove individual certificates.
Email notification
Section titled “Email notification”Certain modules support the sending of e-mail notifications. The following settings are used to globally configure the SMTP server used and the target e-mail address that will receive the notifications:
- Enable email notifications: Globally enable or disable the sending of e-mail notifications.
- SMTP server address: The address of the SMTP server that will be used to send notification e-mails.
- SMTP server port: The TCP port on which the SMTP server is listening.
- SMTP Encryption: Select the encryption method for the SMTP server. Available methods are TLS, STARTTLS and Unencrypted.
- Ignore certificate errors: If the TLS certificate should not be validated, because e.g. it is a self-signed certificate, this setting can be used to turn off certificate validation.
- Username: The username used to log in to the SMTP server.
- Password: The password used to log in to the SMTP server.
- From email address: The e-mail address from which incident notifications will be sent.
- Target email address: The e-mail address to which incident notifications will be sent.
- Email links base URL: This base URL will be used to generate the HTML links in notification e-mails. Since the device cannot by itself determine the proper address by which it is visible to the e-mail recipient this setting can be used to set the correct URL prefix for links sent with the notification e-mails.
- Send periodic system status mail: If set to hourly or daily, a periodic system status report e-mail will be sent to the configured target address with the selected frequency. It will contain basic system information and system health status, management interface configuration and a list of detected LLDP neighbours if the management LLDP feature is enabled.
The Send test email button can be used to verify that the entered settings are working.